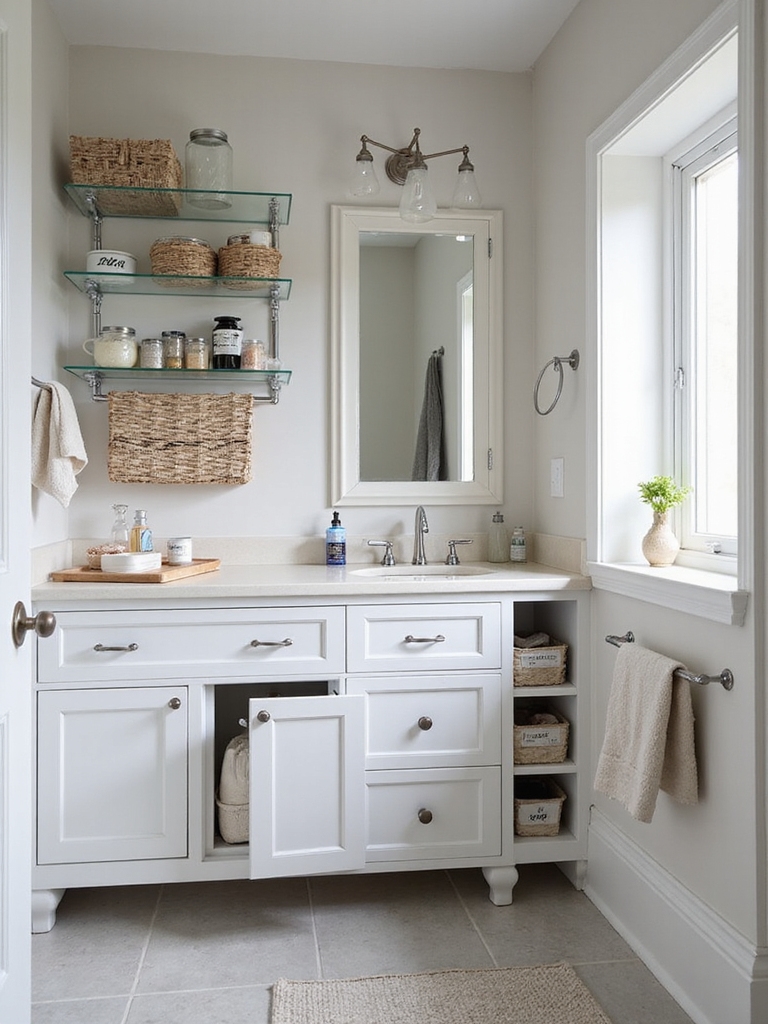
People think a messy bathroom drawer means they own too much. Usually it just means nothing has a fixed home. A drawer without dividers is one big bin where everything slides into a pile, so you dig past the sunscreen to find the tweezers every single morning. Add a few smart compartments and that same drawer turns into quick, confident pulls.
These 19 genius bathroom drawer organization ideas are the small moves that end the rummage for good. Below you will find dividers and custom inserts, daily-use zones, moisture-safe bins, and the deep-drawer tricks most people miss. Most cost a few dollars and an afternoon, and none of them require buying a single new drawer.
Genius Drawers, in Short
- Divide first: adjustable dividers or trays give every item a slot so nothing migrates.
- Zone by routine, with the daily five at the front and backups at the back.
- Use clear, moisture-safe bins and liners so you can see and wipe the drawer clean.
- A one-minute weekly reset keeps the system from sliding back into a pile.
Efficient, Organized Bathroom Drawers

A genius drawer is not about owning less; it is about giving everything a slot. The fastest way there is to empty the drawer, toss what is expired, and only then divide what stays. That order is what keeps you from buying organizers for clutter you should have thrown out. Here is the sequence I use on every vanity drawer:
- Empty and edit the drawer first; half of most drawers is dried-up or duplicate product.
- Group by how often you reach for things, daily up front, backups behind.
- Measure the drawer before buying any insert, since the gap and depth decide what fits.
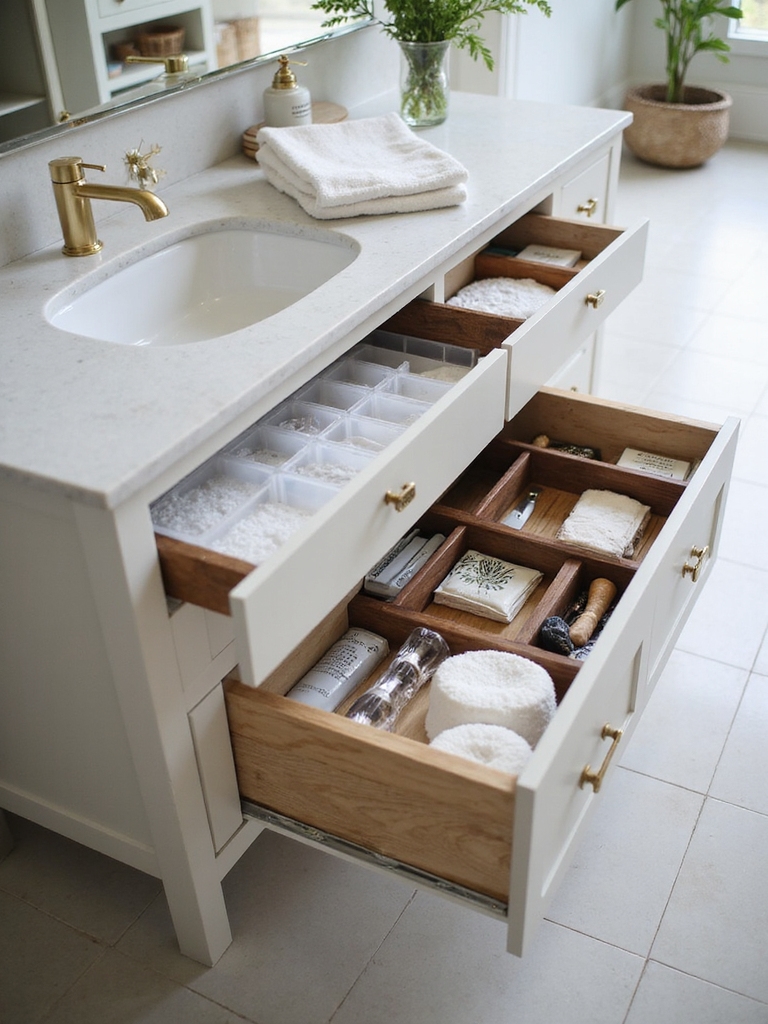
Drawer Dividers That Maximize Efficiency
Dividers are the single most genius thing you can add to a bathroom drawer, because they turn a pile into a place for everything. A deep drawer without them swallows small items; a divided one keeps the tweezers always where the tweezers live. I tell every client to divide before they buy a single bin. A set of adjustable dividers runs $10 to $30, and it is the cheapest fix with the biggest daily payoff.
- Use spring-loaded adjustable dividers that flex as your kit changes.
- Add acrylic trays for a tidier, more permanent layout behind a closed front.
- Slot small dishes for rings, clips, and bobby pins so the tiniest things stop vanishing.
What is your worst drawer problem?
🎯Small things vanish into a pile
Add adjustable dividers and a few small dishes so every item gets a fixed slot.
🎯The drawer is deep and half-empty up top
Layer a shallow insert tray over the tall items below to use the wasted height.
🎯Cords and tools take over
Add an in-drawer outlet or cord channel so the charger and hot tools hide away.
Vanity Drawer Storage Zones
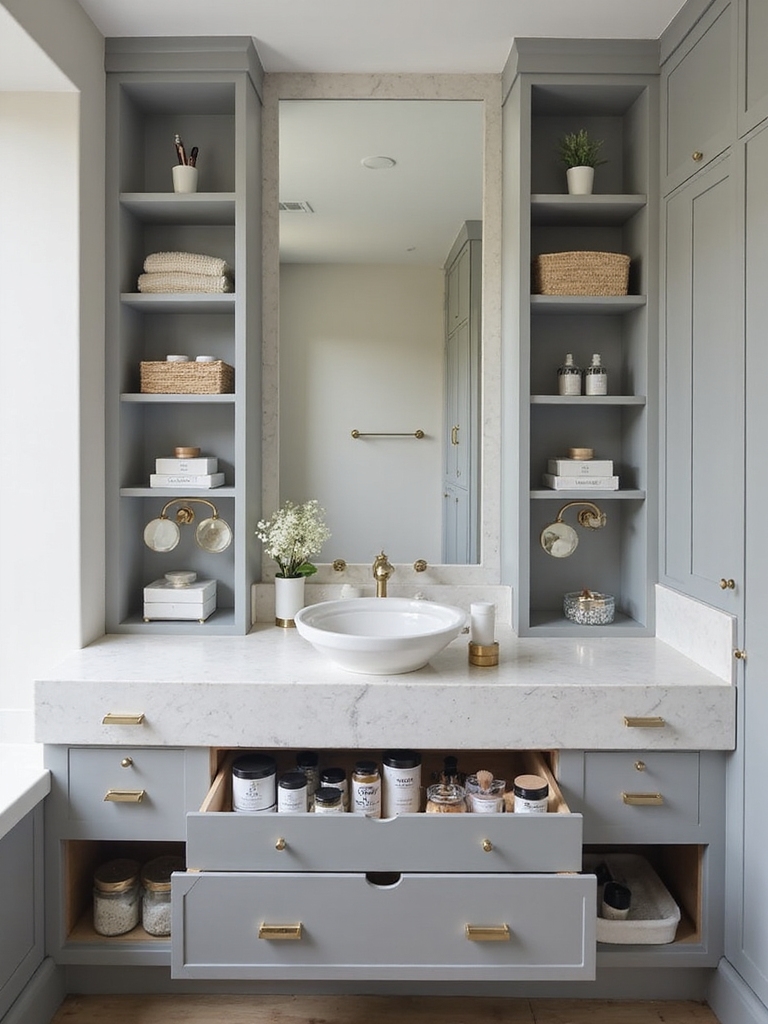
Zoning is the real genius here. The move that makes a drawer feel custom is grouping it by your actual routine, not by category alone, so the things you reach for together actually live together. I group items by the moment you use them, so a morning zone holds the toothbrush, face wash, and serum together, ready to grab in one motion. Your hand learns the layout, and the routine runs on autopilot.
Zone by the Moment You Use It
Put the daily five at the very front of the drawer where you reach without looking. Backups, refills, and occasional tools go to the back, and rarely-used items leave the drawer entirely for a cabinet. This front-to-back logic is what separates a drawer you fight from one that works with you.
In a shared bathroom, give each person a zone or a drawer of their own. Labels do the quiet work, so everyone returns things to the right slot and the system survives a busy week. The same routine-first thinking that organizes a counter surface works inside the drawer too.
A Customizable Drawer Organization System
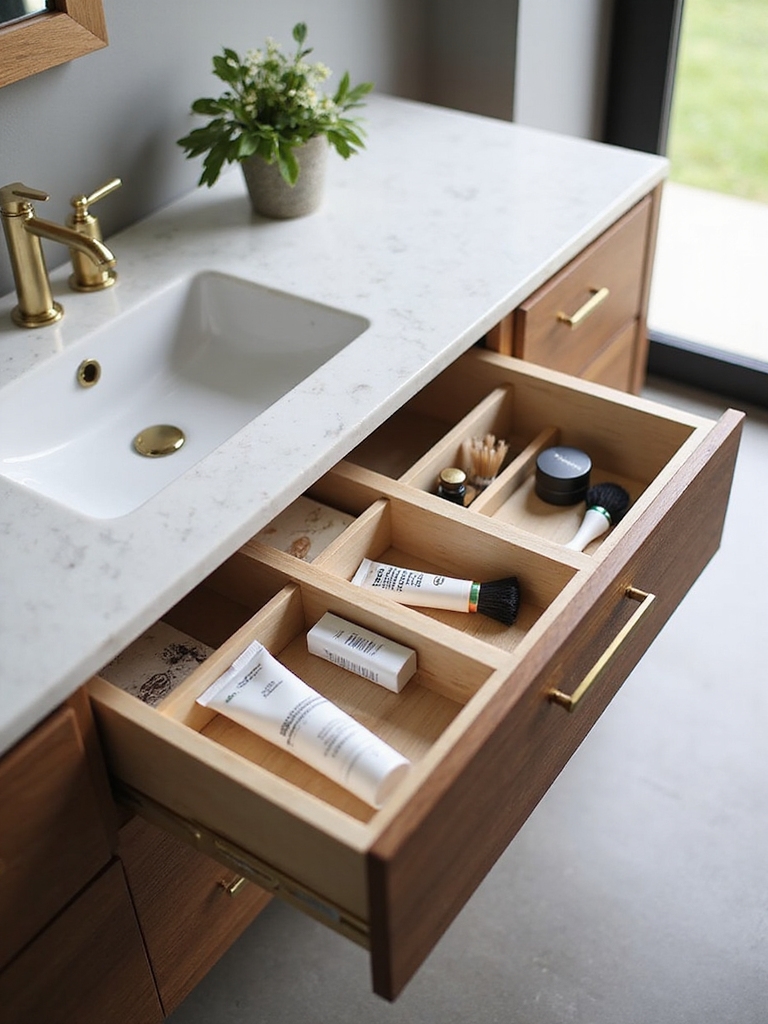
The smartest drawer systems flex as your stuff changes. Clients ask me which insert to start with, and I favor modular pieces over a single fixed tray every time, because the layout you build today is almost never the one you need a year from now.
Interlocking bins, expandable dividers, and stackable inserts let you reconfigure the layout in minutes when your routine shifts. You build the drawer around what you actually own, then rebuild it when that changes.
Layer a Deep Drawer Top and Bottom
Layer up in a deep drawer to use the height most people waste. A shallow insert tray that sits on top of taller items below doubles a deep drawer’s usable space, with the daily things on top and backups hidden underneath. It is the deep-drawer trick almost nobody uses.
Match the inserts to a tidy finish for a designed feel. Clear acrylic, bamboo, or a matte tray in one tone looks intentional and wipes clean. Borrow the same buy-after-you-measure rule from these storage-obsessed cabinet ideas, and you will never return a too-big organizer again.
“Measure before you buy, every time. The most common drawer mistake I see is a cart of pretty organizers that miss the drawer’s depth or width by half an inch and go straight back to the store. Jot the width, depth, and height first, then shop.”
Moisture-Resistant, Stackable Bins
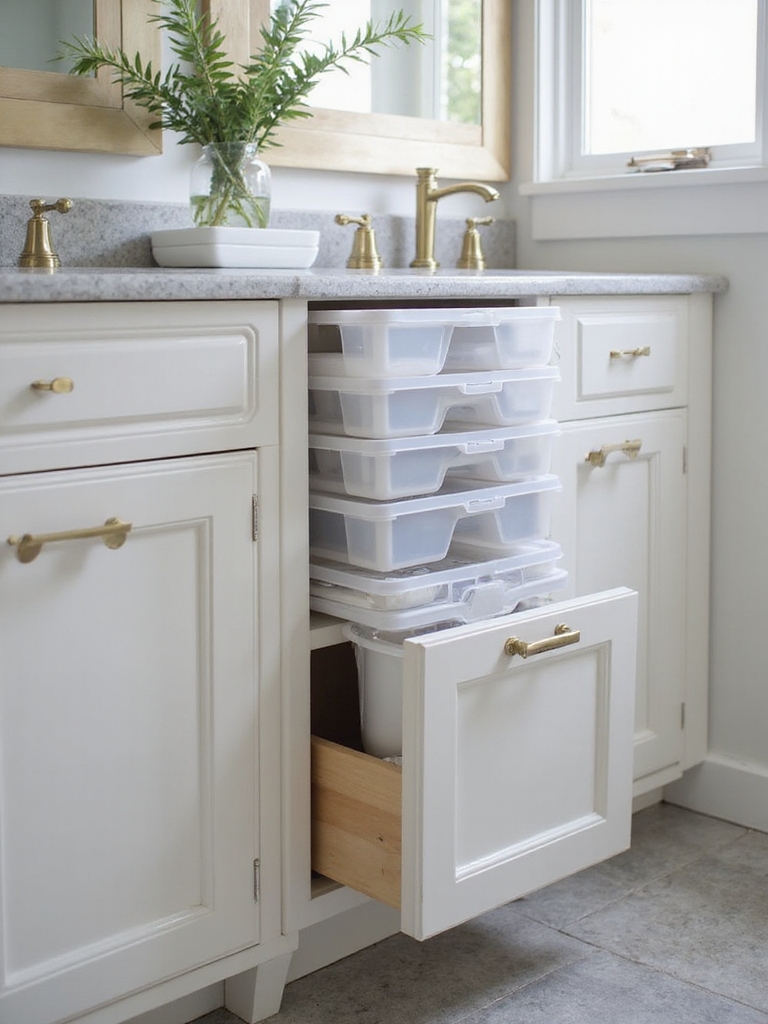
A bathroom drawer lives in humidity, so the bins inside it have to handle damp without warping or growing musty. I default to clear acrylic or silicone organizers with smooth, wipeable sides, since they shrug off steam and let you see what you own at a glance. Skip anything fabric or porous, which holds moisture and starts to smell within a week.
Protect the drawer itself, too. A washable liner on the bottom catches spills and powder, wipes clean in seconds, and stops products from sliding around. Stackable bins make the most of a deep drawer, and a non-slip liner keeps the whole layout from shifting every time you open and close it.
- Choose clear acrylic or silicone bins that resist moisture and wipe clean.
- Add a washable drawer liner to catch spills and stop sliding.
- Use stackable bins to claim the vertical space a deep drawer wastes.
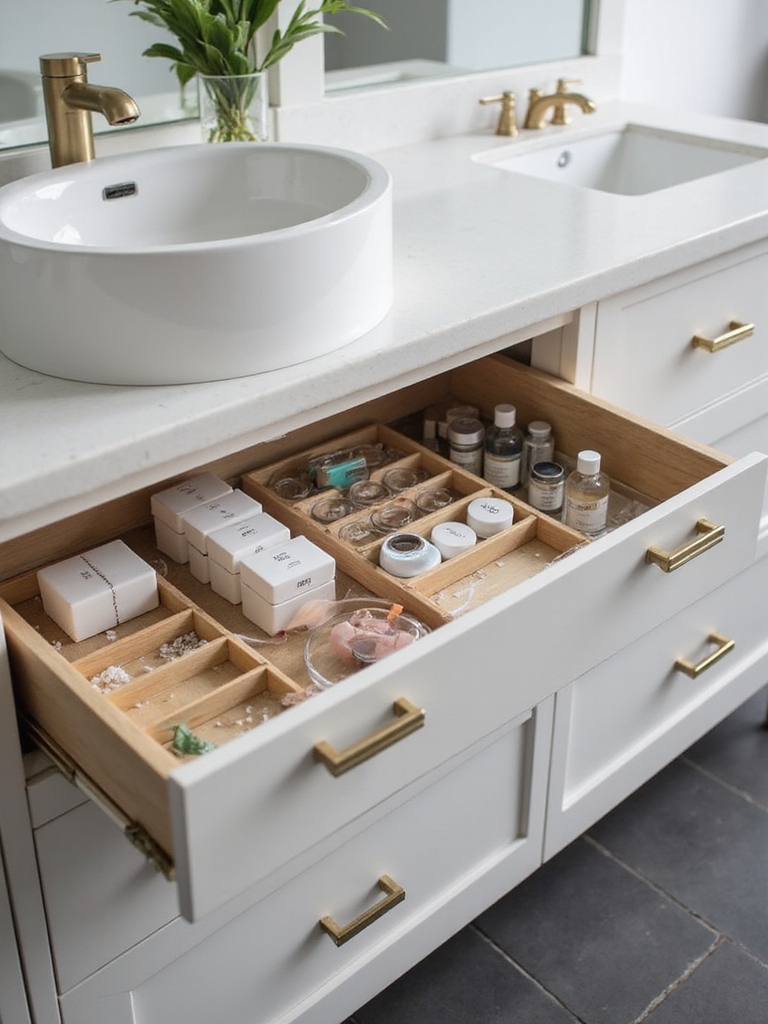
What to Put in Which Drawer
Even a perfectly divided drawer fails if the wrong things live in it, so a little planning pays off. I put the daily essentials in the top drawer at arm’s reach, the things you use weekly in the middle, and the rarely-touched backups in the lowest or deepest one. Matching the drawer to the frequency is what keeps the best real estate for what you reach for most.
Group like with like inside each drawer. Hair tools and their cords in one, skincare in another, dental and first aid in a third, so you never hunt across drawers for one routine. A deep bottom drawer is perfect for bulky items like a hair dryer or a stack of refills that would crowd the shallow ones.
Keep the heavy and the wet low. Store anything that might leak, like oils or a flat iron still cooling, in a lined lower drawer where a spill stays contained. Small daily things belong up top in a shallow, divided drawer where you can see every item the second you open it.
Genius Hacks for Awkward Drawers
Some drawers fight you. A few clever hacks win them back fast. A shallow, too-wide drawer gets order from a tension rod laid across it to corral upright bottles, or from small boxes you already own turned into instant compartments. The genius is using what fits the odd space rather than forcing a standard tray into it.
An outlet inside the drawer is the upgrade that feels like magic. It is the one people are most surprised by. A drawer with a built-in or added power strip charges and hides the electric toothbrush, trimmer, and hot tools, so the cords vanish from the counter for good, leaving a clear surface that makes the whole bathroom look instantly tidier. If a full outlet is out of reach, a simple cord channel cut into a divider keeps a charger tidy.
- Lay a tension rod across a wide drawer to hold upright bottles in place.
- Repurpose small boxes and jar lids as free, custom compartments.
- Add an in-drawer outlet or cord channel to charge and hide tools.
Keep the Drawers Genius for Good
A divided drawer only stays genius if a tiny habit protects it, and the habit really is small. I run a one-minute reset every week or so, dropping the few stray things back into their slots and tossing anything empty. Because every item has a fixed home, putting it away is a reflex rather than a chore.
Wipe the bins and liner when they collect powder or product, which takes under a minute since everything lifts right out. A clear, washable system makes this almost no work, so the drawer stays as clean as the day you set it up. Restock the backups before you run out so nothing piles up out of sight.
Edit on a slower rhythm to stop the slow creep. A quick seasonal purge of expired products and abandoned samples keeps a drawer from refilling itself, and it takes minutes when the layout is already clear. Small and frequent always beats a big, dreaded overhaul once a year.
Style the Drawer You Show
The top drawer is the one guests sometimes see, so it earns a little styling along with the order. Decant cotton rounds and swabs into a small clear jar, keep the dividers in one finish, and the open drawer looks as considered as the counter above it. A genius drawer can be beautiful as well as functional.
Carry the same tidy palette through the drawers you do not show. Matching bins and a consistent liner make even the hidden storage feel intentional, which is the quiet luxury of a well-run vanity. Style the surfaces above with the same care you would bring to any vanity counter, and the whole piece feels designed.
Bathroom Drawer Questions, Answered
?How do I organize a deep bathroom drawer?
Use the height. Put backups and bulky items on the bottom, then float a shallow insert tray on top for the daily things, so you double the usable space. Add adjustable dividers below and stackable bins, and a deep drawer goes from a black hole to your most efficient storage.
?What is the best way to keep small items from sliding around a drawer?
Divide and line it. Adjustable dividers or acrylic trays give every item a slot, small dishes corral the tiniest things, and a non-slip liner stops the whole layout from shifting when you open and close. Together they end the pile-up that makes small items disappear.
?What organizers hold up best in a humid bathroom drawer?
Clear acrylic and silicone, because they resist moisture, wipe clean, and let you see what you own. Avoid fabric or porous organizers, which trap damp and start to smell. Add a washable liner on the drawer bottom to catch spills and powder.
?How do I organize bathroom drawers in a shared bathroom?
Give each person a drawer or a clearly labeled zone within one, sized to their routine. Group items by the moment they are used, keep daily things at the front, and label the slots so everyone returns items to the right spot. Labels are what make a shared system actually last.
?How do I hide cords and tools in a bathroom drawer?
Add an in-drawer outlet, or have one installed, so the electric toothbrush, trimmer, and hot tools charge and store out of sight. If wiring is not an option, cut a small cord channel into a divider for a charger, and store cooled tools flat in a lined lower drawer.
Divide It Once, Reach for It Forever
A genius bathroom drawer comes down to one idea: give everything a fixed home. Empty and edit first, divide what stays, zone it by your routine, choose moisture-safe bins, and protect it with a one-minute weekly reset. Do that and the morning rummage disappears for good, all for a few dollars and a single afternoon of setup.
Start with the drawer that frustrates you most, usually the deep one under the sink, and finish it completely before moving on. So when you open that drawer tomorrow, will the thing you need be right where your hand expects it?